
 |
(copyright Cascade Designs)
|
In the beginning, there was fire.
Then man boiled water. And for a time, it was good.
Then man decided he wanted to make food, beyond boiling water for powdered mashed potatoes and freeze dried coffee, and he looked around him at all the choices...titanium, hard anodized aluminum, non-stick...and it was...confusing.
I am this man. I decided that if I were to do any hikes that were longer than a couple days, I would probably starve -- or just go simply crazy because food choices. I looked at my food that I had taken backpacking in the past and realized just how malnourished I must have been. It seems that I have matured food-wise in the last couple of years; I realized that in order to keep muscle on, and fat off, my body, I needed to take in a high-protein diet. I also realized that I'm slightly gluten-intolerant. Yep, that sucks, but at least I know why I get that nauseous/hyper-salivating feeling after eating bread. Fun.
Anyways, I realized that if I were to do some longer distance backpacking, I would need some quality meals in me. So I set out to find something other than my stainless steel 15-ounce cup, that was light, but didn't give me a whole lot of options when it came to cooking. My goal was to be able to cook brown rice. It provides high quality carbs (which is important for those long hiking days, along with those protein and fats), and would be a good basis for a meal whether I wanted to add broth and make a soup, or add beans and foil packages of tuna or salmon for a complete meal. It is also light, uses a little water (unlike pasta which just boils in water), and those kids on "Survivor" seem able to survive on that stuff for a whole month.
Size: So I had to figure out what size pot I was looking for. Turns out, nobody seems able to figure out what size is good for backpacking, probably because people have different cooking needs. One or two people? Dehydrated meals or cooking? Are you just making a cup of hot coffee? Are you cooking a three course meal? Do you want to bake a pizza in the middle of nowhere? The answers for me are one, cooking, no, no, absolutely not. But that still leaves a lot to of size choices, somewhere in the 600 ml to 1.3 liter range.
600 milliliters in US terms is about 20 ounces. That is deceptively large. Go and fill up a measuring cup that much, you'll be amazed at how big it is. But it won't make you a backcountry wolfgang puck, it will pretty much allow you to boil two cups of water with some added space.
700 milliliters is about 23 ounces. Only 3 ounces more, but 3 ounces it is.
900 milliliters is about 30 ounces. Now we're talking.
1100 milliliters (or 1.1 liter) is 37 ounces. That's a lot of water.
1300 milliliters (or 1.3 liter) is 43 ounces. Wow, that's a fair amount of space.
Shape: Nobody's really decided what kind of pot shape is best for backpacking purposes. There are the deep pots that make the pot look like a really big cup, but some people complain about the shape inhibiting heating times. Then there are more traditional style pots, which look like mini versions of the pots you use at home. This gives you more surface area for heating the bottom, and more space to add food on the top, but it also give you more of an open area for bugs and dirt to get in, and it's also a little more oblong when packed.
Material: Titanium, Titanium with non stick, hard-anodized aluminum, aluminum with non stick, stainless stee-- oh wait, nobody uses stainless steel. It's too heavy. Titanium is the king in backpacking cookware. It's a light, dull-metal that makes for a beautifully ultralight pot, and is said to have some "non-stick properties," though I'm not really sure what that means. Hard anodized aluminum is generally the runner-up, with its electro-chemically treated aluminum that results in scratch resistant aluminum that is also non-stick. Interesting.
Price: Twelve dollars to $65. Yep. You can get a pot for whatever your credit limit is.
Weight: 3.3 oz all the way up to 10.8 for the ones I was looking at.
Other considerations: I want to be able to not only eat out of the pot, but to also drink out of it. If I physically can't drink out of the pot, I have a tiny 6-ounce aluminum cup (0.9 oz) that I could pack along, but would otherwise add to the weight of the pot set, and be one more piece of cookware. There is a nice option to add the Snow Peak HotLips ($7, 0.3 oz each), which is a piece of lip-sized silicone to the rim of the pot to make for easy drinking from a hot pot.
Also, I didn't want to consider hyperlight options such as the Caldera Keg ($10, 1.1 oz), or the infamous Grease Pot ($10, 2.5 oz). These aren't really pots for cooking things in, and I didn't want to have to worry about raw aluminum rusting or sticking.
The choices
So I spent about two weeks researching the crap out of pots. I went into REI and other sporting goods stores and opened up boxes and pantomimed using each of the pots on my stove, getting a feel for their size. Yep, I'm a freak.
Here is a sample of the best titanium and aluminum cookware that I spotted on my search. This is by no means a complete list, but it gives you an idea of all the choices and pros and cons of the selection out there.

Capacity: 850 ml
Weight: 5.5 oz (including cup and stuff sack)
Material: Titanium
Price: $59.95
Snow Peak is THE brand of titanium cookware. They also tend to be on the pricey side, much like the Evernew line. I own one of their stoves, and love it, and got to handle a few pieces of snow peak's cookware in a local REI. I found the Mini Solo to be a little too tall for it's width, but it's nice that it comes with a cup. Beyond the Mini Solo set though, I compared all of the other Snow Peak offerings, but found them to be off from what I was looking for. The 3-piece Ti Cookset seemed nice, but everything was a bit small, which was surprising given the shape of the pans, and left no real options for drinking. Plus, I'd probably only need the big pot and maybe the fry pan. Then there's the Hybrid Trail Cookset, and the Hybrid Summit Cookset, which are interesting options, but the silicone cups that they come with are close to useless -- after hearing reviews of their flimsiness, I checked them out at the store, and they were in fact very flimsy. As in, you might want to hold that cup of hot joe with two hands in case it flips inside out. (If you want to see this silicone cup concept done right, check out the Sea To Summit X-Cup ($10, 1.7 oz)

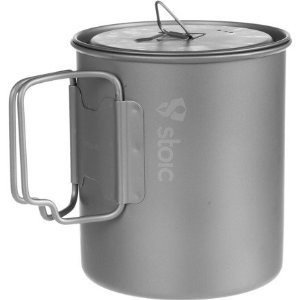
Capacity: 700 ml
Weight: 3.99 oz (including mesh sack)
Material: Titanium
Price: $19.50
An excellent deal for titanium cookware, the Stoic brand is actually made by the Backcountry.com retailer, and they have some killer deals on high end gear, similar to the REI brand.

Capacity: 850 ml
Weight: 3.03 oz
Material: Titanium
Price: $46.00
A big jump up in price from the Stoic, but you add 150 ml of capacity and lose a mesh sack (maybe that was the ounce difference?). The lightest pot I could find for the capacity, but that most likely comes by sacrificing thickness. Not necessarily a bad thing, it will equal faster boil times, but also faster cooling, which makes it less ideal on a cold night.

Capacity: 710 ml
Weight: 3.8 oz (6.0 oz for set with cozy and gripper)
Material: Aluminum with Non-stick
Price: $12.00 ($20.00 for set)
Great price, probably because it's not titanium. On the downside, it doesn't have a handle, unless you carry along the gripper. I have read of people using these and just drilling tiny holes on each side to make a bail-style handle.

Capacity: 900 ml
Weight: 5.8 oz
Material: Titanium with Non-stick
Price: $53.70
For all the talk of Evernew pots in the ultralight community, these are hard to find. I like the deep pot style, and it has non-stick coating to boot. It also comes with the fry-pan/lid, which I think is either ingenious or retarded. It depends on what mood you catch me in. They have a ton of other pot styles, but they are similarly hard to find for as many products as they have. Variations include the Uncoated Deep Pot ($64, 4.4 oz) which loses the non-stick coating and 1.4 ounces, Uncoated Ultralight ($50, 4.2 oz) which loses 1.6 ounces, the non-stick coating, the fry-pan lid, and sports a wider, pot-like base. There's also a 1000 ml Pasta Pot (~$50, 4.1 oz) which boasts a strainer in the lid and coated handles.

Capacity: 900 ml
Weight: 6.7 oz (including stuff sack)
Material: Titanium
Price: $44.95
While it doesn't beat the Evernew selection in weight, it's still an attractive pot set, and another company that's taking a stab at the ultralight cookware department.

Capacity: 850 ml
Weight: 4.2 oz
Material: Titanium
Price $50
I remember this titanium pot being one of the first on the market. Which is why it's surprising that they haven't worked out the kinks yet. I read quite a few reviews stating that the lid is nice and tight, but unfortunately creates a bit of a seal when it's flush on top and water is boiling inside. The multiple reports of this (with one reviewer stating how it caused him to spill the pot's contents he pulled so hard) led me to cross this off the "considered" list.

Capacity: 1300 ml
Weight: 5.5 oz (with the 1.3L pot, lid, and stuff sack)
Material: Titanium with Non-stick
Price: $55
This offering from Stoic is so different from the above that I decided to list it separately. Obviously I would split this cookset up, leaving the 1600 ml pot at home and taking the rest, resulting in a quite light 5.5 oz for such a big pot, especially if you count the non-stick. However, 1.3 L is starting to get on the large side.

Capacity: 600 ml
Weight: 6.3 oz (with gripper, neoprene sleeve, spork)
Material: Hard-anodized aluminum
Price: $28
On the lower end of the price scale, but also on the lower end of sizes. However, it excels in the addition of the "ingenious" (as many reviewers called it) silicone two-finger pot gripper, insulating neoprene sleeve to keep drinks warm and to allow you to grab the pot with your hands, and a proprietary "Sip-It" lid, which becomes a lipped lip (a la Starbucks cups) for the pot once it's cozily in its insulating sleeve. The spork (or "foon" as they call it), is extremely light, and I've read reviews of how easily it can be snapped in half.

Capacity: 1100 ml
Weight: 10.9 oz (with stuff sack, insulated mug/bowl, spork)
Material: Hard anodized aluminum with non-stick
Price: $45
Definitely the heaviest set in the bunch, but also includes the most items. The pot features a really nice, coated handle that you squeeze to slide into position from its locked position (where it holds the lid down and the contents inside). The set also includes a very nice 14 oz mug/bowl, which attains a tight fit with the lid of the pot, and allows for a covered, insulated cup to sip from. To round out the set, all of this gets housed in a coated stuff sack that is stiff enough to use as a mini sink. I read in a review that the pot weighs around 7 oz by itself, without the added accoutrements that it offers.
Making the Decision
So, obviously there's lots to choose from. I put them all in an Amazon Wish List and pored over details. Do I sacrifice the weight for a bigger pot? Do I sacrifice an ounce to save $30? Is non-stick important for the backcountry? Do I need a fry-pan lid? Could I use it as a plate? Do I want to be able to boil all the water I need in one sitting?
Let's cut to the chase. I ordered the GSI Halulite Minimalist. Why? I decided that it was the best balance between functionality, price, durability, features, and especially minimalism.
I realized that the non-stick feature is really important to me. On a backpacking trip last weekend, I cooked rice in an old, crappy aluminum pot and realized that since I don't have a full kitchen to clean up with, I wanted to be able to add some water to rinse, and wipe away the rest with my pack towel. I love the thought that GSI put into their product; the silicone pot gripper has a mini-magnet inside so you can stick it to your fuel canister while you cook; the pot lid is incredible easy to grab when you're cooking, and when it's flipped over, it makes an awesome lid for sipping morning coffee brews, or night teas. The spork will probably go in the trash, to be replaced by my equally light Light My Fire Spork.
It is THE smallest pot I listed. It's almost more of a cup than a pot, but that's the beauty of it. After taking a look at it at REI multiple times, I realized that the width of the cup was perfect -- I could grab it with one hand, but wouldn't have trouble scooping foil pack salmon into a hot cup of rice and beans. Also, when it comes time to pack it away, I can put a 110 gram snow peak canister inside, the stove itself, the pot gripper, and then stick the suctioned lid on top to keep it all inside. There's nothing more beautiful than a little self contained unit while packing, and I didn't want to worry about the lid banging around and coming loose on a titanium pot while I'm walking.
It also solved the cup problem for me, I don't often drink my hot drink with my meal, it's usually after. So i could easily boil and cook, and then put enough water on to make a drink afterward, sit it in the coozy, and sip it through the suctioned lid while I pack up camp, without worrying about kicking dirt into an open cup, and with less worry about possible spillage.
It also solved the cup problem for me, I don't often drink my hot drink with my meal, it's usually after. So i could easily boil and cook, and then put enough water on to make a drink afterward, sit it in the coozy, and sip it through the suctioned lid while I pack up camp, without worrying about kicking dirt into an open cup, and with less worry about possible spillage.
Nonetheless, I worry that it is too small, that I'll have regrets about the added weight -- about 2 ounces added to my already existing kit. I'm always supposed to get lighter! But I think the ease of use and the beauty of the well thought out kit will be worth it's weight in ounces. If not, I'll go back to the drawing board and rediscover what I really need.
Happy Trails!


